이전 게시글에서 칼리 리눅스에 대해 간단히 알아 보았다.
In a previous post, we briefly looked at Kali Linux.
거두절미하고 바로 설치를 진행해보자.
Let's proceed with the installation immediately.
이 글에선 가상 머신이 아닌 직접 설치를 구현해보겠다.
In this article, we'll implement a direct installation rather than a virtual machine.
먼저 검색 사이트에 "kali linux"를 검색해보자.
First, search for "kali linux" on the search site.

우측 상단에 메뉴 아이콘을 선택하자.
Select the menu icon on the top right.

다운로드를 클릭하여 칼리 리눅스 다운로드 페이지로 이동하자.
Click Download to go to the Kali Linux download page.

"Kali Linux 64-Bit(Installer)" 항목을 클릭하여 iso 이미지 파일을 다운로드하자.
Click the "Kali Linux 64-Bit(Installer)" item to download the iso image file.

집에서 쓰지 않는 4GB 이상의 USB를 준비하여 파일을 넣어보자.
Prepare 4GB or more of USB that you don't use at home and put the files in.
먼저 "rufus"를 검색하여 rufus 사이트로 이동하자.
First, search for "rufus" and go to the rufus site.
Rufus는 USB 메모리 및 플래시 드라이브를 포맷하고 부팅할 수 있도록 만드는 도구이다.
Rufus is a tool that lets you format and boot USB memory and flash drives.

사이트로 이동하면 바로 밑에 설치하기 항목이 있다. 클릭하자.
When you go to the site, there is an install item underneath. Let's click.


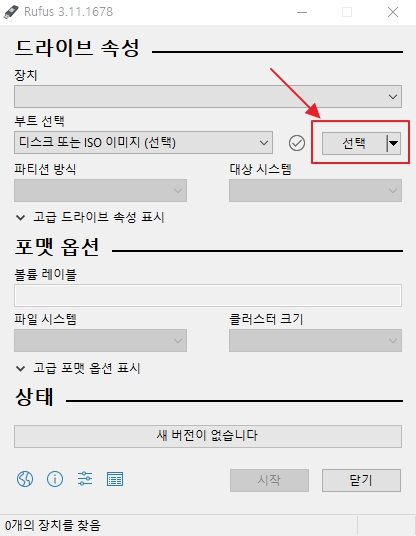
다운로드가 완료되었다면 "rufus" 파일을 클릭하여 USB에 설치해보자.
Once the download is complete, click on the "rufus" file to install it on the USB.
필자는 처음에 USB를 연결하지 않아서 장치 항목에 아무것도 안뜨지만 여러분이 USB를
PC와 연결한 상태라면 장치에 연결된 USB장치명이 뜰 것이다.
I don't have a USB connection initially, so I don't see anything in the device list,
but if you're connected to a PC, the name of the USB device connected to the device will appear.
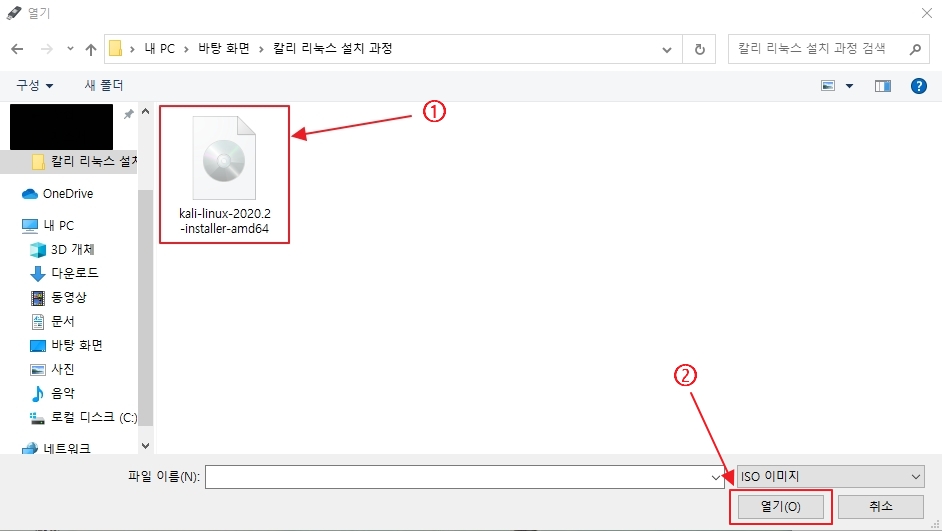
선택 항목을 눌러 파일을 불러오자.
Click on the selection to load the file.
이제 시작 버튼을 눌러 USB에 부팅 파일을 덮어써주자.
Now press the start button to overwrite the boot file on the USB.
이 때 주의할 점은 iso파일을 USB 전체에 덮어 써지므로 중요한 파일이 있을 경우 꼭 옮겨놓도록 하자.
At this point, be careful because iso files are overwritten on the entire USB,
so be sure to move any important files.

칼리 리눅스는 타 리눅스 운영체제와 달리 "ISO 이미지 모드로 쓰기(권장)" 이 아니라
"DD이미지 모드로 쓰기" 를 선택하여 설치를 진행해야 한다.
Unlike other Linux operating systems, Kali Linux needs to select "Write in DD image mode"
rather than "Write in ISO image mode (recommended)" to install.
"ISO 이미지 모드로 쓰기(권장)" 와 "DD이미지 모드로 쓰기" 의 차이점은 밑에 링크를 걸어놓을테니
궁금하면 들어가서 읽어보도록 하자.
The difference between "Write in ISO image mode (recommended)" and "Write in DD image mode"
will be posted at the link below.
https://github.com/pbatard/rufus/issues/843

설치가 완료되었다면 다음 단계에선 본격적으로 칼리 리눅스를 설치해보자.
Once the installation is complete, the next step is to install Kali Linux in earnest.
'Linux > Kali_Linux' 카테고리의 다른 글
| 칼리 리눅스 virtual box 설치 및 Centos 7 설치 ① / Install virtual box and install Centos 7 on Kali Linux ① (0) | 2020.07.02 |
|---|---|
| 칼리 리눅스 크롬 설치 / Install Chrome on Kali Linux (0) | 2020.06.30 |
| 칼리 리눅스 한글 설정 / Kali Linux Hangul Configuration (0) | 2020.06.30 |
| 칼리 리눅스 설치 과정 ② / Kali Linux installation process ② (0) | 2020.06.28 |
| 칼리 리눅스를 시작하며 / Starting Kali Linux (0) | 2020.06.27 |